Working with SQL Server on Linux for .NET Development
Working with SQL Server on Linux for .NET Development
Being .NET developer I find myself working with SQL Server all the time, even though that seems to be slowly changing to PostgreSQL. In the past, this would limit my ability to do full-time development on Linux because I would still need a Windows box to run SQL Server or use a hosted solution. This doesn’t work so well when you are doing development in your free time as it is cost prohibitive. Fortunately, Microsoft has released SQL Server for Linux just last year and at the same time started producing Docker containers for it. You can find the list of Docker containers here all based on Ubuntu.
This post is going to walk through getting SQL Server running in a container and how to connect to it from an ASP .NET core application for doing local development. Let’s get started.
SQL Server 2017 Container
Make sure that you have Docker installed on your system, if you are having trouble getting it installed on your distro please reach out and I can help. I will be running all my commands as myself and not as the superuser. If you haven’t followed these steps on Docker’s website, I would encourage you to do so. If you don’t want to do that, then make sure that you put sudo in front of these docker commands.
Pulling down the image:
$ docker pull mcr.microsoft.com/mssql/server:latest
latest: Pulling from mssql/server
f6fa9a861b90: Pull complete
5ad56d5fc149: Pull complete
170e558760e8: Pull complete
395460e233f5: Pull complete
6f01dc62e444: Pull complete
3a52205d40a6: Pull complete
6192691706e8: Pull complete
876584dea625: Pull complete
49e9c80a6fa9: Pull complete
3e6f1aaa79f4: Pull complete
Digest: sha256:1bbf3b11687ce4d97eb5e6b6e61ccc500d0eff92f92e51893112a3fc665ce7b7
Status: Downloaded newer image for mcr.microsoft.com/mssql/server:latest
Now that we have the image, we need to start it up and connect to it to make sure it is operating as we expect. The container requires the following flags to be set when starting:
- ACCEPT_EULA
- SA_PASSWORD
- MSSQL_PID
The first two are what you expect them to be, the last one is an interest as that determines the version of the product we will be running. The options are Developer, Express, Standard, Enterprise, and EnterpriseCore, the default is the Developer edition and what we will be using in this post. With that out of the way. Let’s run the container:
$ docker run -e 'ACCEPT_EULA=Y' -e 'SA_PASSWORD=yourStrong(!)Password' -p 1433:1433 -d mcr.microsoft.com/mssql/server:latest
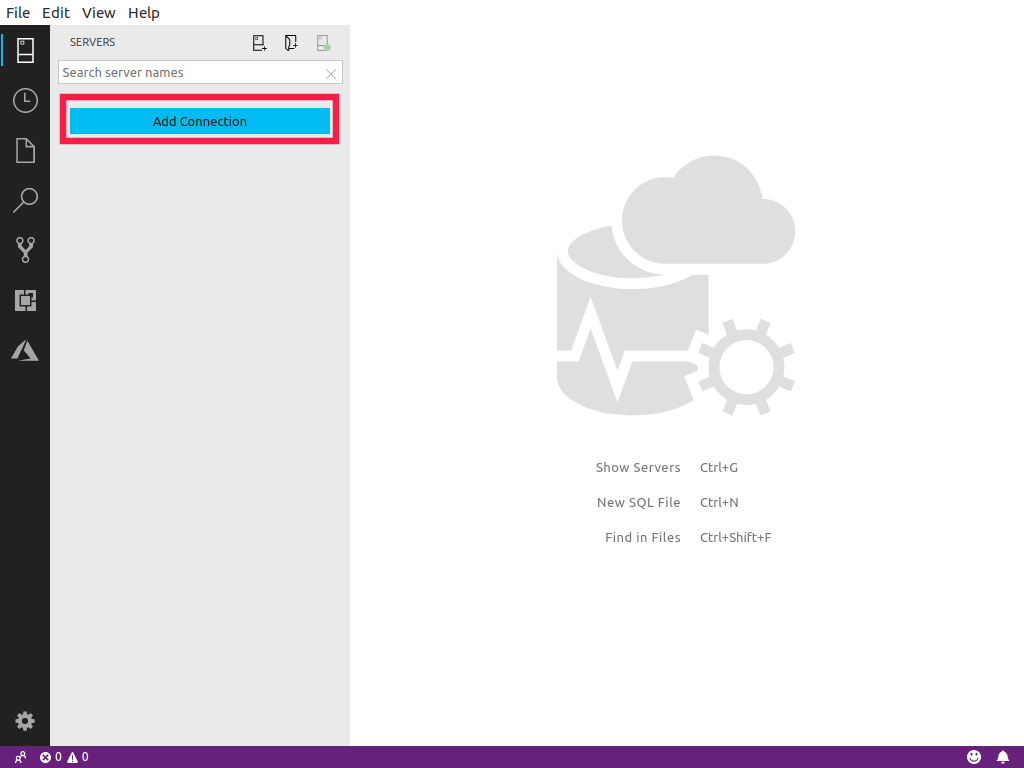
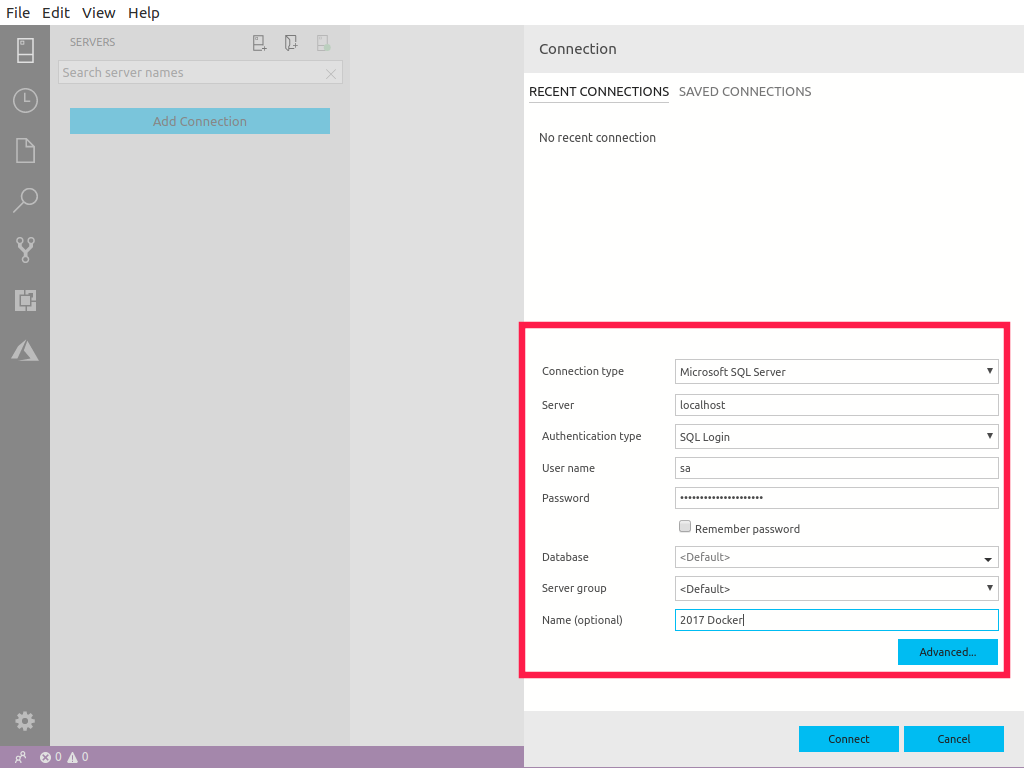
Once that is up and running, open Azure Data Studio so we can connect to the database.
Adding a connection in Data Studio
Great, we have a working SQL Server database running locally and we can connect to it. In the next section, we are going to use an example application to show how it works with ASP .NET Core and Entity Framework core.
ASP .NET Core application with Entity Framework Core
We are going to use Microsoft’s tutorial located here as a guide for making a basic project for use with EF Core.
Let’s create our project:
$ mkdir EfOnLinux
$ cd ./EfOnLinux
$ dotnet new mvc
$ dotnet add package Microsoft.EntityFrameworkCore.SqlServer
As usual, let’s make sure we didn’t break it and that it still builds.
$ dotnet build
Build succeeded.
    0 Warning(s)
    0 Error(s)

Time Elapsed 00:00:08.74
Great! Now let’s get to creating our models. We are going to model pets and pet owners and we will define items in a single file since it is such a simple example.
Let’s start by creating the Model.cs class:
$ cd Models
$ touch Model.cs
Now edit the Model.cs class and enter the following:
using Microsoft.EntityFrameworkCore;
using System.Collections.Generic;

namespace EfOnLinux.Models {
    public class PetsContext : DbContext {
        public PetsContext(DbContextOptions<PetsContext> options) : base(options) {
        }

        public DbSet<Owner> Owners { get; set; }
        public DbSet<Pet> Pets { get; set; }
    }

    public class Owner {
        public int OwnerId { get; set; }
        public string FirstName { get; set; }
        public string LastName { get;set; }
        public List<Pet> Pets { get; set; }
    }

    public class Pet {
        public int PetId { get; set; }
        public string Name { get; set; }
        public int OwnerId { get; set; }
        public Owner Owner { get;set; }
    }
}
Now we need to wire up the database context with the dependency injection framework. To do this open Startup.cs and add the add the new lines.
First, add the new using statements:
using EfOnLinux.Models;
using Microsoft.EntityFrameworkCore;
With those added to the list of using statements, we can now modify the ConfigureServices method to add our code.
public void ConfigureServices(IServiceCollection services)
        {
            services.Configure<CookiePolicyOptions>(options =>
            {
                // This lambda determines whether user consent for non-essential cookies is needed for a given request.
                options.CheckConsentNeeded = context => true;
                options.MinimumSameSitePolicy = SameSiteMode.None;
            });

            // This is the new code.
            var connection = Configuration.GetConnectionString("DefaultDatabase");
            services.AddDbContext<PetsContext>(options => options.UseSqlServer(connection));

            services.AddMvc().SetCompatibilityVersion(CompatibilityVersion.Version_2_1);
        }
Now let’s add our connection string information to our appsettings.Development.json by adding the following info:
{
  "Logging": {
    "LogLevel": {
      "Default": "Debug",
      "System": "Information",
      "Microsoft": "Information"
    }
  },
  "ConnectionStrings" : {
    "DefaultDatabase": "Server=localhost;Database=PetExample;User Id=sa;Password=yourStrong(!)Password;"
  }
}
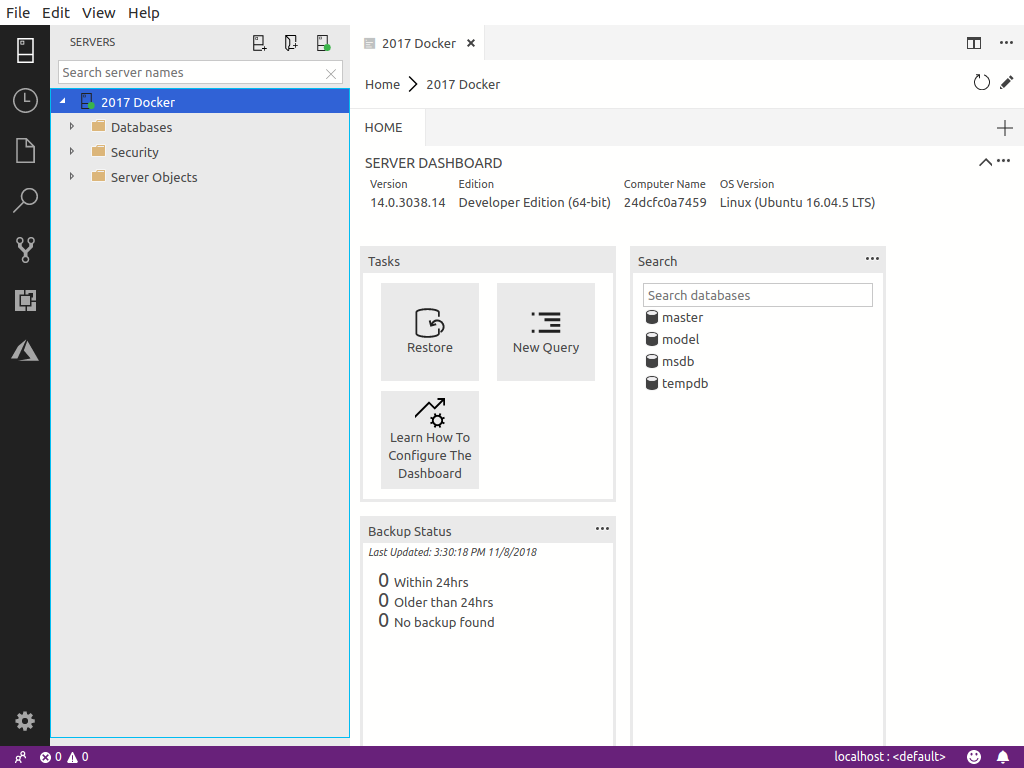
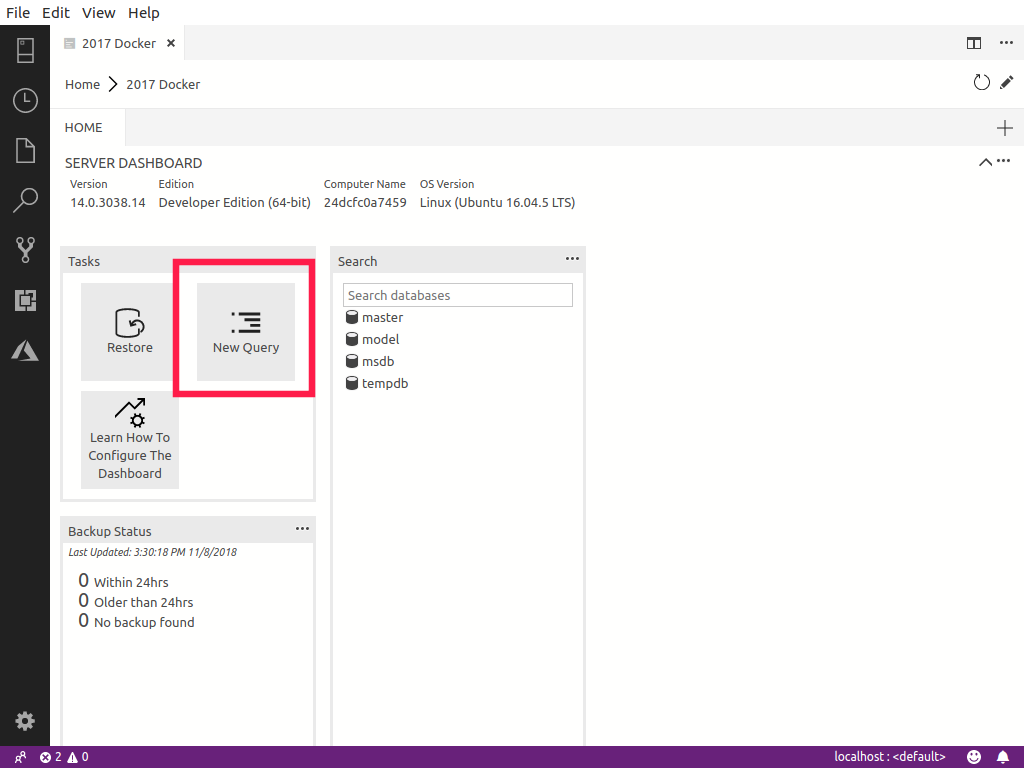
With our connection string, the last step to do before we run our migrations is to create our PetExample database. We can do this with Data Studio. Open it up and click on New Query.
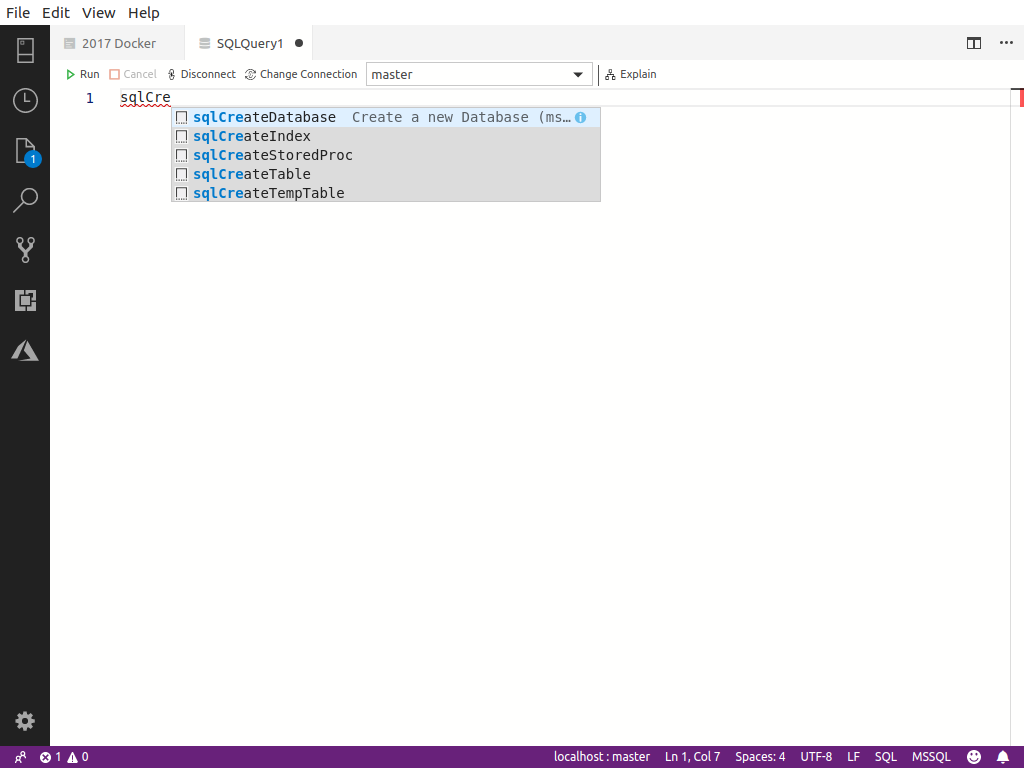
With that window open, we can use some of their shortcuts to make this easy. Start typing sqlCre and a snippet will pop, just hit enter.
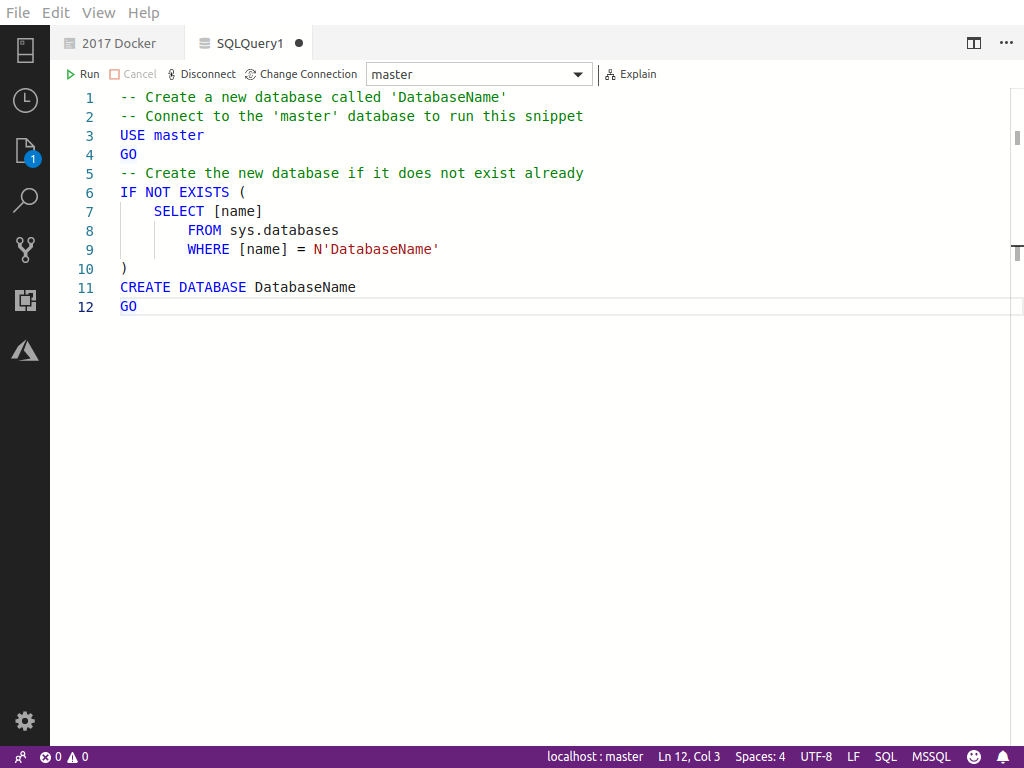
Then you should see this:
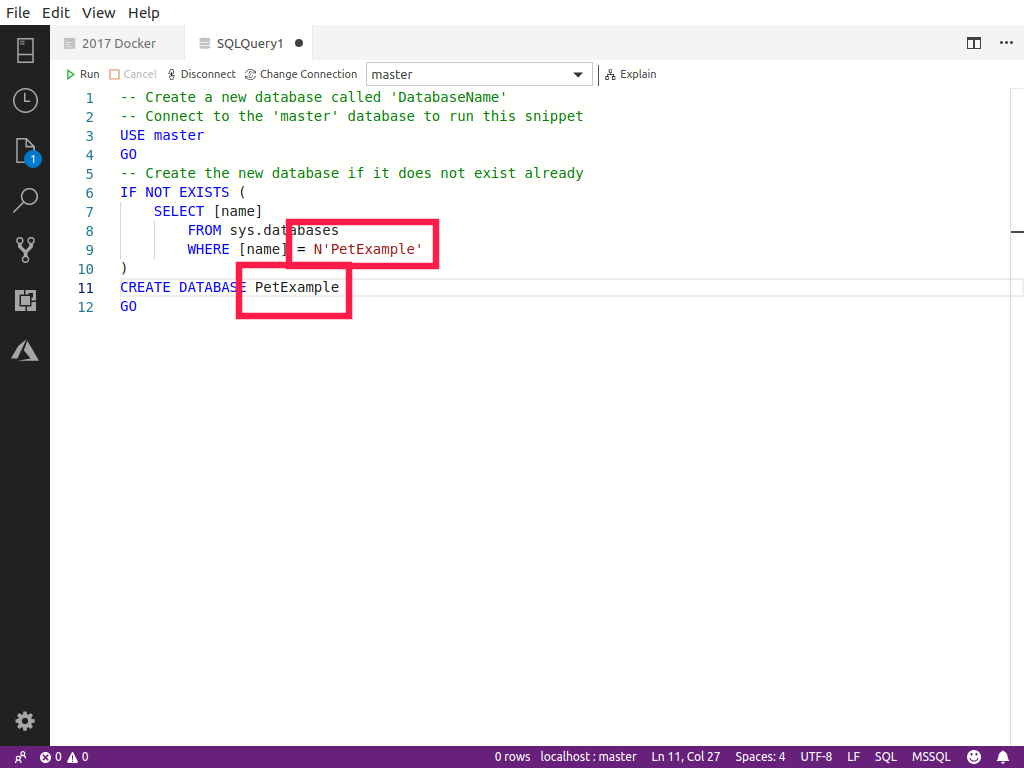
Replace DatabaseName with PetExample and run the query.
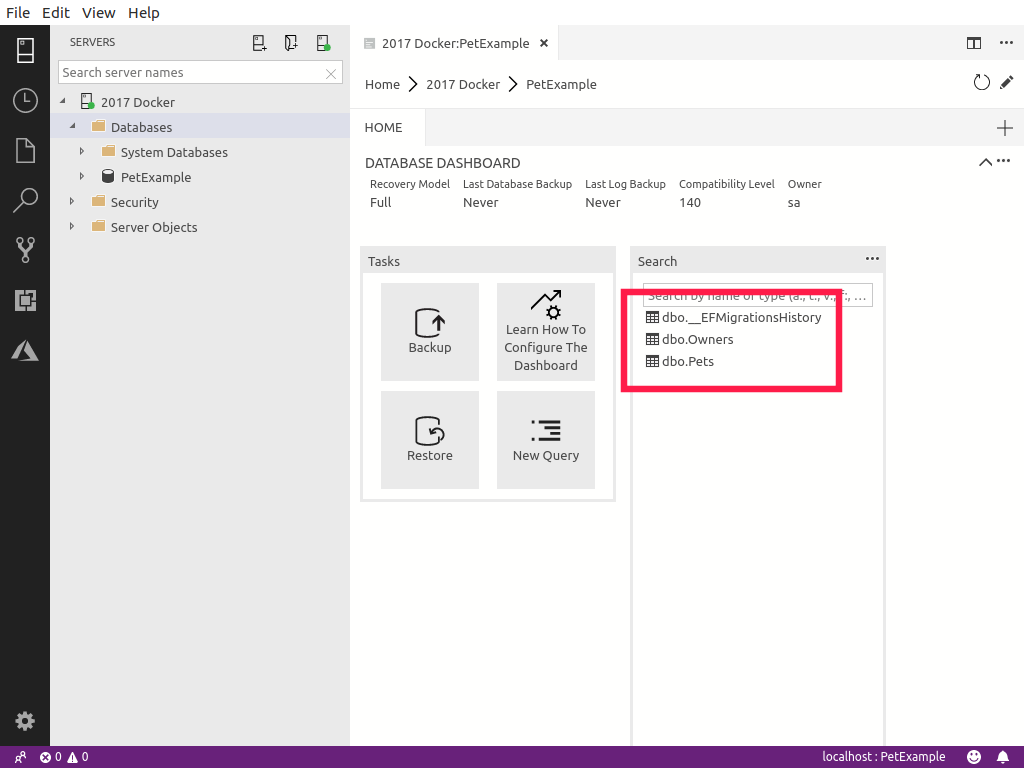
Now if you go back to your dashboard for your server you will see the database in the list.

Now we are ready to create our Entity Framework migrations and create our tables. Run the following command to create the migration.
$ dotnet ef migrations add InitialCreate
info: Microsoft.EntityFrameworkCore.Infrastructure[10403]
      Entity Framework Core 2.1.4-rtm-31024 initialized 'PetsContext' using provider 'Microsoft.EntityFrameworkCore.SqlServer' with options: None
Done. To undo this action, use 'ef migrations remove'
Now run the migration to create the tables.
$ dotnet ef database update
info: Microsoft.EntityFrameworkCore.Infrastructure[10403]
      Entity Framework Core 2.1.4-rtm-31024 initialized 'PetsContext' using provider 'Microsoft.EntityFrameworkCore.SqlServer' with options: None
info: Microsoft.EntityFrameworkCore.Database.Command[20101]
      Executed DbCommand (20ms) [Parameters=[], CommandType='Text', CommandTimeout='30']
      SELECT OBJECT_ID(N'[__EFMigrationsHistory]');
.......
Done.
It ran successfully, let’s use Data Studio to verify it.
Now we just need to create our controller and views. We are going to use scaffolding for this tutorial because this isn’t the interesting part.
Install scaffolding tools.
$ dotnet tool install -g dotnet-aspnet-codegenerator
You can invoke the tool using the following command: dotnet-aspnet-codegenerator
Tool 'dotnet-aspnet-codegenerator' (version '2.1.5') was successfully installed.

$ dotnet add package Microsoft.VisualStudio.Web.CodeGeneration.Design
info : PackageReference for package 'Microsoft.VisualStudio.Web.CodeGeneration.Design' version '2.1.5' added to file '/home/phillipsj/code/EfOnLinux/EfOnLinux.csproj'.

$ dotnet restore
Restoring packages for /home/phillipsj/code/EfOnLinux/EfOnLinux.csproj...
Restore completed in 1.06 sec for /home/phillipsj/code/EfOnLinux/EfOnLinux.csproj.
Now we can generate our controllers and views with the scaffolding tools.
$ dotnet aspnet-codegenerator controller -name OwnersController -m Owner /
                                         -dc PetsContext --relativeFolderPath Controllers /
                                         --useDefaultLayout --referenceScriptLibraries
RunTime 00:00:15.80
Now let’s run the application.
$ dotnet run
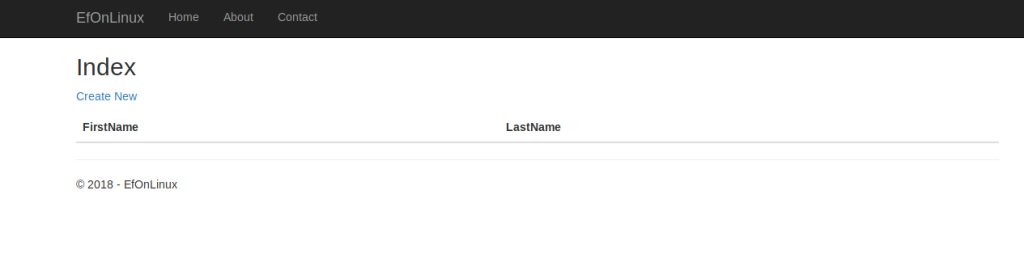
Navigate to https://localhost:5001/owners and you should see this:
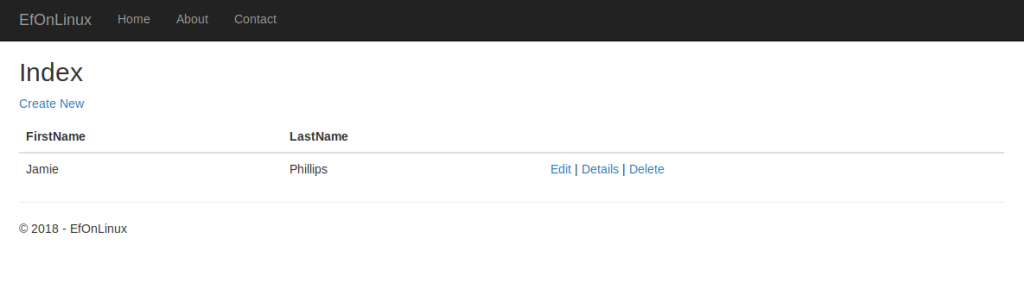
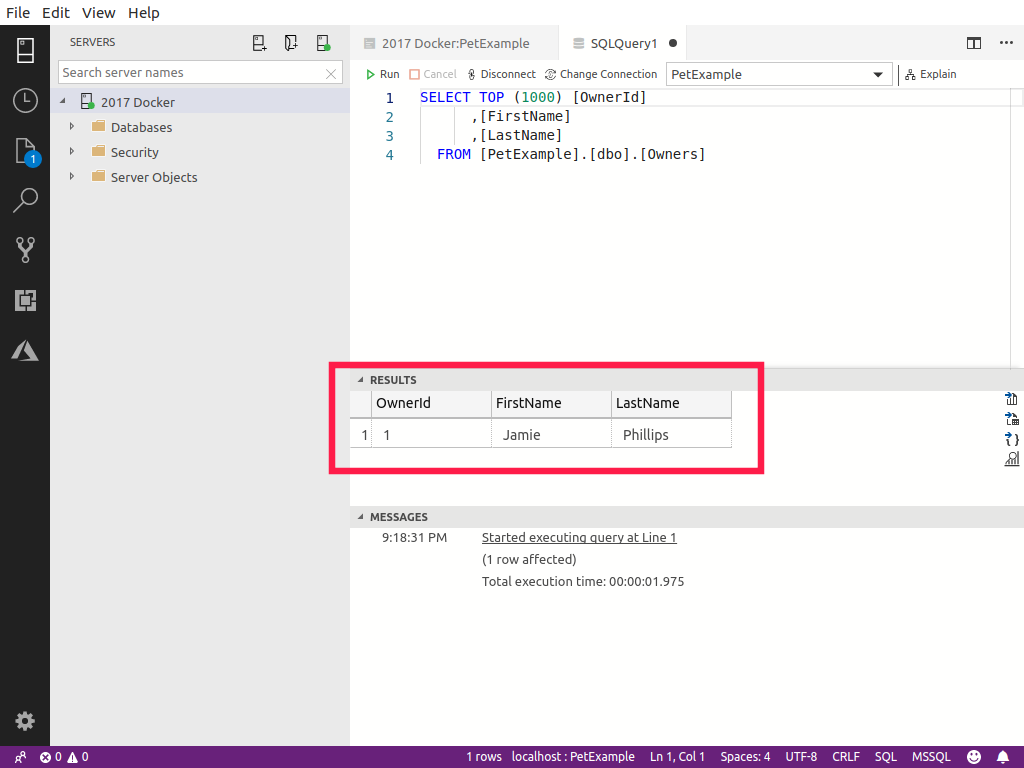
Now add a few Owners and let’s see if they show up in the SQL Server running on Linux in a docker container.
Adding an owner on the website:
Owner in the database:
Conclusion
Hope this helps to demonstrate that you can have a full development experience on Linux using all the tools that you are comfortable or familiar with using. Feel free to ask for any follow-up posts.
Thanks for reading,
Jamie
If you enjoy the content, then consider buying me a coffee.