Terraforming Azure SQL Database
Terraforming Azure SQL Database
In this post, we are going to learn how to use Terraform to create an Azure SQL Database and then extend the Terraform template to create a geo-replicated database and a failover group. Let’s get started.
Basic Azure SQL Database
First, we are going to create a basic Azure SQL Database template. The first step is to create our terraform file.
$ touch main.tf
Now that we have our main.tf file, let’s start adding content. First, we need to add the Azure provider.
provider "azurerm" {
    version = "~> 1.19"
}
Next, we need to add our resource group.
resource "azurerm_resource_group" "main" {
    name     = "MyDB-RG"
    location = "East US"
}
Now we need to make sure that we have a SQL Server defined.
resource "azurerm_sql_server" "main" {
    name                         = "mysqlserver"
    resource_group_name          = "${azurerm_resource_group.main.name}"
    location                     = "${azurerm_resource_group.main.location}"
    version                      = "12.0"
    administrator_login          = "4dm1n157r470r"
    administrator_login_password = "4-v3ry-53cr37-p455w0rd"
}
Now we need to add a SQL Server firewall rule to allow Azure Services to connect to the database. This isn’t done by default when using Terraform. That rule will look like the following.
resource "azurerm_sql_firewall_rule" "main" {
  name                = "AlllowAzureServices"
  resource_group_name = "${azurerm_resource_group.main.name}"
  server_name         = "${azurerm_sql_server.main.name}"
  start_ip_address    = "0.0.0.0"
  end_ip_address      = "0.0.0.0"
}
Now we can add our Azure SQL Database.
resource "azurerm_sql_database" "main" {
  name                             = "mysqldatabase"
  resource_group_name              = "${azurerm_resource_group.main.name}"
  location                         = "${azurerm_resource_group.main.location}"
  server_name                      = "${azurerm_sql_server.main.name}"
  edition                          = "Standard"
  requested_service_objective_name = "S1"
}
Now we have a complete template that will create an Azure SQL Database that is using the standard edition at the S0 performance level.
Here is the template altogether.
provider "azurerm" {
    version = "~> 1.19"
}

resource "azurerm_resource_group" "main" {
    name     = "MyDB-RG"
    location = "East US"
}

resource "azurerm_sql_server" "main" {
    name                         = "mysqlserver"
    resource_group_name          = "${azurerm_resource_group.main.name}"
    location                     = "${azurerm_resource_group.main.location}"
    version                      = "12.0"
    administrator_login          = "4dm1n157r470r"
    administrator_login_password = "4-v3ry-53cr37-p455w0rd"
}

resource "azurerm_sql_firewall_rule" "main" {
  name                = "AlllowAzureServices"
  resource_group_name = "${azurerm_resource_group.main.name}"
  server_name         = "${azurerm_sql_server.main.name}"
  start_ip_address    = "0.0.0.0"
  end_ip_address      = "0.0.0.0"
}

resource "azurerm_sql_database" "main" {
  name                             = "mysqldatabase"
  resource_group_name              = "${azurerm_resource_group.main.name}"
  location                         = "${azurerm_resource_group.main.location}"
  server_name                      = "${azurerm_sql_server.main.name}"
  edition                          = "Standard"
  requested_service_objective_name = "S0"
}
Now we can validate if our template syntax is correct. The first step is to initialize Terraform.
$ terraform init
Initializing provider plugins...
- Checking for available provider plugins on https://releases.hashicorp.com...
- Downloading plugin for provider "azurerm" (1.19.0)...

Terraform has been successfully initialized!

You may now begin working with Terraform. Try running "terraform plan" to see
any changes that are required for your infrastructure. All Terraform commands
should now work.

If you ever set or change modules or backend configuration for Terraform,
rerun this command to reinitialize your working directory. If you forget, other
commands will detect it and remind you to do so if necessary.
Now we can validate.
$ terraform validate
Now that it is validated we need to wire up our Azure Account so we can execute against it.
First login to Azure using the Azure CLI.
$ az login
Now we need to set the subscription we would like to target.
$ az account set --subscription $MY_SUBSCRIPTION_ID
With Azure all wired up, let’s execute our plan and see what will be created.
$ terraform plan

Plan: 4 to add, 0 to change, 0 to destroy.
The plan shows we will be creating four resources, that looks correct to me, let’s execute it. You will be prompted if you would like to proceed, and yes if you do.
$ terraform apply
Apply complete! Resources: 4 added, 0 changed, 0 destroyed.
We just made a mistake and I don’t want you all picking up bad habits. We need to make sure that we add some tags to our resources.
I am going to create a local variable to hold our tag map so we can reuse those and apply the same tags to all resources.
Add the following to main.tf right after our provider statement.
locals {
    tags = {
        "managed"     = "terraformed"
        "owner"       = "me@me.me"
        "environment" = "learning"
    }
}
Now we will add the following to all of our resources except the firewall rule.
tags = "${local.tags}"
So here is what we will have once it has been added.
provider "azurerm" {
  version = "~> 1.19"
}

locals {
  tags = {
    "managed"     = "terraformed"
    "owner"       = "me@me.me"
    "environment" = "learning"
  }
}

resource "azurerm_resource_group" "main" {
  name     = "MyDB-RG"
  location = "East US"
  tags     = "${local.tags}"
}

resource "azurerm_sql_server" "main" {
  name                         = "mytfqlserver"
  resource_group_name          = "${azurerm_resource_group.main.name}"
  location                     = "${azurerm_resource_group.main.location}"
  version                      = "12.0"
  administrator_login          = "4dm1n157r470r"
  administrator_login_password = "4-v3ry-53cr37-p455w0rd"
  tags                         = "${local.tags}"
}

resource "azurerm_sql_firewall_rule" "main" {
  name                = "AlllowAzureServices"
  resource_group_name = "${azurerm_resource_group.main.name}"
  server_name         = "${azurerm_sql_server.main.name}"
  start_ip_address    = "0.0.0.0"
  end_ip_address      = "0.0.0.0"
}

resource "azurerm_sql_database" "main" {
  name                             = "mysqldatabase"
  resource_group_name              = "${azurerm_resource_group.main.name}"
  location                         = "${azurerm_resource_group.main.location}"
  server_name                      = "${azurerm_sql_server.main.name}"
  edition                          = "Standard"
  requested_service_objective_name = "S1"
  tags                             = "${local.tags}"
}
Now let’s run our plan and we will see that all our resources will be modified with the new tags.
$ terraform plan
# Excluded the rest before here.
  ~ azurerm_sql_server.main
      tags.%:           "0" => "3"
      tags.environment: "" => "learning"
      tags.managed:     "" => "terraformed"
      tags.owner:       "" => "me@me.me"


Plan: 0 to add, 3 to change, 0 to destroy.
Let’s apply that and get our resources tagged.
$ terraform apply
Apply complete! Resources: 0 added, 3 changed, 0 destroyed.
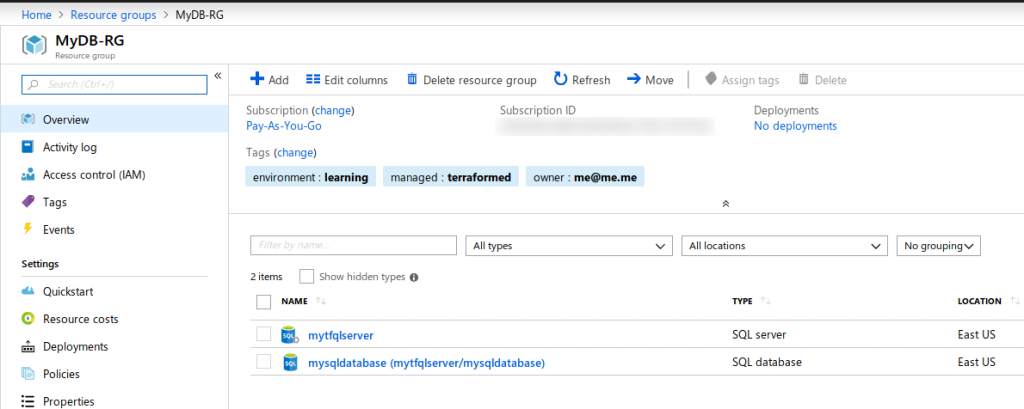
Here is the result of the Terraform in the Azure Portal.
Advanced Azure SQL Database
Now the template above is great if you only need a single database in a single region. For non-critical applications that can tolerate some higher RPO and/or RTO, this is a great solution. You can learn more about RTO and RPO in the Microsoft documentation. Microsoft guarantees 99.9% uptime with all tiers. If you need better reliability and more control over your RPO and RTO then you should consider using active geo-replication along with failover groups.
Requirements for a failover group is at least another region with a SQL Server and the database you want to be replicated. Once you create your failover group, Azure will automatically create your database on the SQL Server in the other region and start replication.
To achieve this we will need to use some features in Terraform that we haven’t used just yet. The first feature is how Terraform creates multiple resources from a single resource and the other is how to use an ARM template from inside Terraform. Let’s get started by creating multiple resources from a single definition.
Create multiple resources with Terraform
Terraform’s template language is a declarative style language and therefore doesn’t have the normal control flow that you are used to seeing. So things like for, foreach, etc are not available. What Terraform offers instead is called count which allows you to define a property called count. The count can be any integer that is zero or greater, with zero being a means to not create the resources. Let’s get to adding a count to our resource group to start since we need to put our SQL Servers in different regions.
We are going to introduce a variable that will be our regions we want the solution deployed. This variable will need to a list type.
Open main.tf and add the following just below the provider block.
variable "regions" {
  type        = "list"
  default     = ["East US"]
  description = "Regions to deploy your resources, can be one or more. Defaults to East US and West US."
}
We just created a variable called regions of type list which is just an array. In our array, we added some default values. I picked a single region to start so we can make this refactoring have an identical output as our previous iteration of the template.
Now let’s edit our resource group.
resource "azurerm_resource_group" "main" {
  name     = "MyDB-RG-${count.index}"
  location = "${element(var.regions, count.index)}"
  tags     = "${local.tags}"
  count    = "${length(var.regions)}"
}
Okay, so there are three changes that have been made. The first change that we should focus on is the new count property. We want this to be dynamically based on the number of regions we have in our variable. So we set it equal to the length of our regions list. The next one to focus on is the location. We set our location by extracting the element from our list at the current index of the count property. Finally, our name needs to be unique so to make it predictable, we are going to use our index again and add it to the name. If we pass three regions, we will get three resources groups total all in the order in which the regions have been specified in the list.
Now that we have a resource group created in the regions in our list, we can start adding our other resources. Since we are focusing on a database failover group, we really just need to add the SQL Server and Firewall rules. Let’s start with the SQL Server.
resource "azurerm_sql_server" "main" {
  name                         = "mytfqlserver-${count.index}"
  resource_group_name          = "${element(azurerm_resource_group.main.*.name, count.index)}"
  location                     = "${element(azurerm_resource_group.main.*.location, count.index)}"
  version                      = "12.0"
  administrator_login          = "4dm1n157r470r"
  administrator_login_password = "4-v3ry-53cr37-p455w0rd"
  tags                         = "${local.tags}"
  count                        = "${length(var.regions)}"
}
Now the count and name properties should look familiar. What is different is how we are accessing the resource group name and location. I have introduced the splat expression which is how Terraform grabs all resources that are created from using a count. We are using the splat to create a list of all the names and locations, then using the element function and count.index to pull out each value in order. This will guarantee that all resources will be aligned correctly. We are going to reuse the SQL Admin and password, this isn’t advised, but works well for this example.
If you set this up by not reusing the username and password, then be aware that the failover group expects that the same account with the same credentials and permissions exist on all databases part of the replication.
Let’s get the firewall rule which shouldn’t introduce any new syntax.
resource "azurerm_sql_firewall_rule" "main" {
  name                = "AllowAzureServices"
  resource_group_name = "${element(azurerm_resource_group.main.*.name, count.index)}"
  server_name         = "${element(azurerm_sql_server.main.*.name, count.index)}"
  start_ip_address    = "0.0.0.0"
  end_ip_address      = "0.0.0.0"
  count               = "${length(var.regions)}"
}
Here we don’t change the name because the name doesn’t need to be unique. We are not going to create multiple databases, but it would be similar if it was required. The reason for not creating multiple databases is that the failover group will automatically handle the replication for us. We do need to make a small tweak to the database to create it in our first region.
resource "azurerm_sql_database" "main" {
  name                             = "mysqldatabase"
  resource_group_name              = "${azurerm_resource_group.main.*.name[0]}"
  location                         = "${azurerm_resource_group.main.*.location[0]}"
  server_name                      = "${azurerm_sql_server.main.*.name[0]}"
  edition                          = "Standard"
  requested_service_objective_name = "S1"
  tags                             = "${local.tags}"
}
One piece of new syntax is demonstrated above and that is how you can use the splat syntax to treat a collection of resources as an index so you can pull out the first value.
Now if you execute the template as we did above, it should create exactly the same output. If you haven’t destroyed it yet, then it should tell you when you plan that no changes happened. This is an example what we want.
Create the Failover Group with Terraform
Terraform currently doesn’t support creating a failover group natively. We have a couple different options like I showed here using a null_resource, however, a much better approach will be to use the azurerm_template_deployment resource which allows ARM templates to be used directly from Terraform. Let’s get started.
Create a directory inside of the folder that hosts your main.tf called arm. Inside that directory create a failover.json file.
$ mkdir arm && cd $_
$ touch failover.json
Now open the failover.json file and add the following. If you want to read more about what is happening here than you can read this post.
{
    "$schema": "https://schema.management.azure.com/schemas/2015-01-01/deploymentTemplate.json#",
    "contentVersion": "1.0.0.0",
    "parameters": {
        "sqlServerPrimaryName": {
            "type": "string",
            "metadata": {
                "description": "The name of the primary SQL Server."
            }
        },
        "partnerServers": {
            "type": "string",
            "metadata": {
                "description": "The list of names of the secondary SQL Server."
            }
        },
        "partnerResourceGroups": {
            "type": "string",
            "metadata": {
                "description": "The list of names of the secondary SQL Server Resource Groups."
            }
        },
        "sqlFailoverGroupName": {
            "type": "string",
            "metadata": {
                "description": "The name of the failover group."
            }
        },
        "sqlDatabaseName": {
            "type": "string",
            "metadata": {
                "description": "The name of the SQL Database."
            }
        },
        "location": {
            "type": "string",
            "defaultValue": "[resourceGroup().location]",
            "metadata": {
                "description": "Location for all resources."
            }
        }
    },
    "variables": {
        "partnerArray": "[split(parameters('partnerServers'),',')]",
        "partnerRgArray": "[split(parameters('partnerResourceGroups'),',')]"
    },
    "resources": [
        {
            "apiVersion": "2015-05-01-preview",
            "type": "Microsoft.Sql/servers/failoverGroups",
            "name": "[concat(parameters('sqlServerPrimaryName'), '/', parameters('sqlFailoverGroupName'))]",
            "properties": {
                "serverName": "[parameters('sqlServerPrimaryName')]",
                "copy": [{
                    "name": "partnerServers",
                    "count": "[length(variables('partnerArray'))]",
                    "input": {
                        "id": "[resourceId(variables('partnerRgArray')[copyIndex('partnerServers')], 'Microsoft.Sql/servers/', variables('partnerArray')[copyIndex('partnerServers')])]"
                    }
                }],
                "readWriteEndpoint": {
                    "failoverPolicy": "Automatic",
                    "failoverWithDataLossGracePeriodMinutes": 60
                },
                "readOnlyEndpoint": {
                    "failoverPolicy": "Disabled"
                },
                "databases": [
                    "[resourceId('Microsoft.Sql/servers/databases', parameters('sqlServerPrimaryName'), parameters('sqlDatabaseName'))]"
                ]
            }
        }
    ]
}
This is heavily adapted from this example by Microsoft and can be found here. Now we just need to integrate that into Terraform using the azurerm_template_deployment.
Let’s add our resource.
resource "azurerm_template_deployment" "failovergroup" {
  name                = "failover"
  resource_group_name = "${element(azurerm_resource_group.main.*.name, 0)}"
  template_body       = "${file("arm/failover.json")}"
  deployment_mode     = "Incremental"
}
Pretty basic and nothing unexpected, we are going to create it in the same region we create our database which is the first one. Now our ARM template takes parameters and Terraform provides a parameters block that takes key-value pairs that will get passed into the ARM template. Let’s add ours.
resource "azurerm_template_deployment" "failovergroup" {
  name                = "failover"
  resource_group_name = "${element(azurerm_resource_group.main.*.name, 0)}"

  template_body = "${file("arm/failover.json")}"

  parameters {
    "sqlServerPrimaryName"  = "${element(azurerm_sql_server.main.*.name, 0)}"
    "sqlDatabaseName"       = "${azurerm_sql_database.main.name}"
    "sqlFailoverGroupName"  = "myfailover"
    "partnerServers"        = "${join(",", slice(azurerm_sql_server.main.*.name, 1, length(var.regions)))}"
    "partnerResourceGroups" = "${join(",", slice(azurerm_resource_group.main.*.name, 1, length(var.regions)))}"
  }

  deployment_mode = "Incremental"
}
As you can see we are passing five parameters in and leaving out some of our default parameters. Most of this should look pretty normal so far except for the last two. These need to be comma-separated strings to pass into our ARM template, so we use the join function to create the comma-separated string. Inside of our join we use slice function to remove the first element since it isn’t a partner server.
All the changes together
Here is what the template should look like with all the changes. You can also look at it on Github here.
provider "azurerm" {
  version = "~> 1.19"
}

variable "regions" {
  type        = "list"
  default     = ["East US"]
  description = "Regions to deploy your resources, can be one or more. Defaults to East US and West US."
}

locals {
  tags = {
    "managed"     = "terraformed"
    "owner"       = "me@me.me"
    "environment" = "learning"
  }
}

resource "azurerm_resource_group" "main" {
  name     = "MyDB-RG-${count.index}"
  location = "${element(var.regions, count.index)}"
  tags     = "${local.tags}"
  count    = "${length(var.regions)}"
}

resource "azurerm_sql_server" "main" {
  name                         = "mytfqlserver-${count.index}"
  resource_group_name          = "${element(azurerm_resource_group.main.*.name, count.index)}"
  location                     = "${element(azurerm_resource_group.main.*.location, count.index)}"
  version                      = "12.0"
  administrator_login          = "4dm1n157r470r"
  administrator_login_password = "4-v3ry-53cr37-p455w0rd"
  tags                         = "${local.tags}"
  count                        = "${length(var.regions)}"
}

resource "azurerm_sql_firewall_rule" "main" {
  name                = "AllowAzureServices"
  resource_group_name = "${element(azurerm_resource_group.main.*.name, count.index)}"
  server_name         = "${element(azurerm_sql_server.main.*.name, count.index)}"
  start_ip_address    = "0.0.0.0"
  end_ip_address      = "0.0.0.0"
  count               = "${length(var.regions)}"
}

resource "azurerm_sql_database" "main" {
  name                             = "mysqldatabase"
  resource_group_name              = "${azurerm_resource_group.main.*.name[0]}"
  location                         = "${azurerm_resource_group.main.*.location[0]}"
  server_name                      = "${azurerm_sql_server.main.*.name[0]}"
  edition                          = "Standard"
  requested_service_objective_name = "S1"
  tags                             = "${local.tags}"
}

resource "azurerm_template_deployment" "failovergroup" {
  name                = "failover"
  resource_group_name = "${azurerm_resource_group.main.*.name[0]}"

  template_body = "${file("arm/failover.json")}"

  parameters {
    "sqlServerPrimaryName"  = "${azurerm_sql_server.main.*.name[0]}"
    "sqlDatabaseName"       = "${azurerm_sql_database.main.name}"
    "sqlFailoverGroupName"  = "myfailover"
    "partnerServers"        = "${join(",", slice(azurerm_sql_server.main.*.name, 1, length(var.regions)))}"
    "partnerResourceGroups" = "${join(",", slice(azurerm_resource_group.main.*.name, 1, length(var.regions)))}"
  }

  deployment_mode = "Incremental"
}
Let’s create us a variable file so we can pass two regions into our main.tf file instead of the default that is one region.
$ touch terraform.tfvars
Now let’s open terraform.tfvars and override our regions variable.
regions = ["East US", "Central US"]
Now when you run Terraform plan it will automatically load the terraform.tfvars file. More about how this works can be found here.
$ terraform plan
Plan: 8 to add, 0 to change, 0 to destroy.
We only defined five resources, but since we passed in two regions we can see our count is acting correctly and eight resources will be created. Let’s execute it and see the results.
$ terraform apply
Apply complete! Resources: 8 added, 0 changed, 0 destroyed.
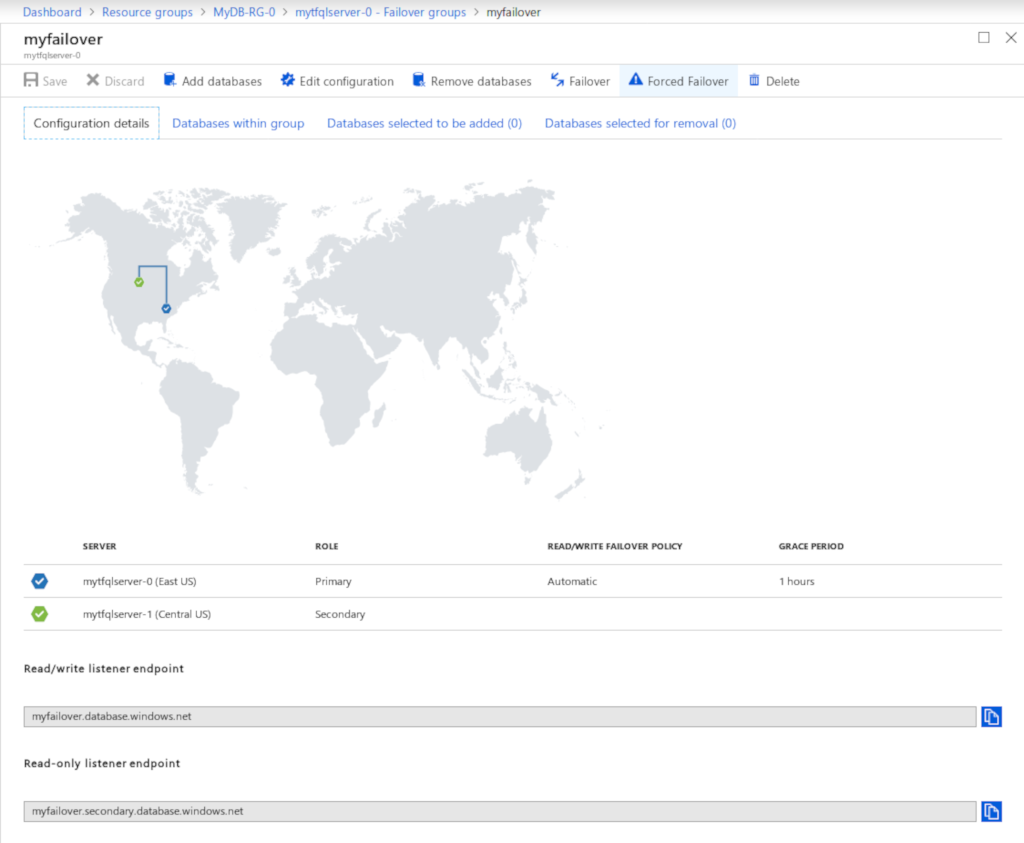
Here are all the resources in the portal.

Now here is a view of the failover group.
Conclusion
This guide was intended to get you started working with Azure SQL DB in Terraform. We started with a basic example and expanded upon it to build out a geo-replicated database using a failover group. There are a lot of subtle techniques that I pointed out as they appeared, I would encourage you to read the links on each topic and a few of my previous posts mentioned. The next related post will be how this can be taken a step further and turned into a module that can be shared and reused.
Thanks for reading and I hope you enjoyed. Please let me know on this repo’s GitHub, Twitter, or LinkedIn what you thought about the post.
Jamie
If you enjoy the content, then consider buying me a coffee.